
Looking for unique DIY holiday projects? Look no further! These crafts will make your Christmas chic and eco-friendly.
Between mid-November and New Year’s Day, Canadians generate a reported 900,000 extra tonnes of garbage. Making just a few smart choices can make a big difference. For example, if we all wrapped just three gifts in reused materials, it would save enough paper to cover 45,000 hockey rinks.
When preparing for the festive season, instead of heading to the mall, consider upcycling, foraging, and recycling. Using some of last year’s leftover loot to create this year’s wrapping, gifts, and décor is a great way to keep garbage to a minimum.
Here are some unique decoration ideas that are kind to your wallet, and the environment.
Tabletop Christmas Tree
This simple idea can be repeated with different colour schemes, types of paper, or even different heights. When displayed together these make a lovely centrepiece. For a different texture, instead of crumpling the paper, try folding it into concertinas.
You will need:
Discarded paper such as old magazines, books, or gift wrap
Thick cardboard boxes (equivalent to 3 – 24 in x 24 in x 24 in /61 cm x 61 cm x 61 cm boxes)
2 – 12 in (30 cm) wooden kebab skewers
Scissors or pinking shears
Strong packing tape
1 pine cone (approx. 2 in/5 cm)
Thin screwdriver or drill
Using scissors, pinking shears, or by tearing the edges, cut 10 squares of paper in each of the following sizes: 12 in (30 cm), 10 in (25 cm), 8 in (20 cm), 6 in (15 cm), 4 in (10 cm), and 2 in (5 cm) for a total of 60 squares.
Keeping each size in separate piles, loosely crumple the paper squares. Do not crumple into a tight ball; this is to provide texture only, and the squares should be separated afterward.
Cut or tear the cardboard into slightly smaller square pieces—60 in total. The sizes should correspond with the paper squares and will be used as spacers between the paper square layers; they will not be seen. (You may not need to use all the spacers at the top of your tree. Use your judgment to determine how you would like it to look.)
Thread one of the largest cardboard squares onto a kebab skewer all the way to the bottom. Make an “x” shape underneath with tape to stop it from sliding off. This will provide the base of the tree.
Start to build upward, alternating between cardboard spacers and paper squares, twisting the squares as you go to create an even cone shape, ending about 3/4 in (2 cm) from the top. (The second skewer can be used to make holes in the centre of your squares first if you are finding it difficult to thread them on without a premade hole.)
Carefully hold the pine cone, taking care to keep your fingers out of harm’s way. Bore a hole in the bottom using a small drill on the slowest setting, or a thin screwdriver.
Thread the pine cone on top of the skewer to finish.
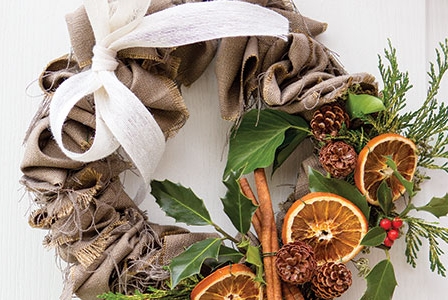
Rustic Wreath
Feel free to be creative with these instructions; you can decorate as much or as little as you like, depending on what you have available.
You will need:
2 wire coat hangers
2 or 3 burlap sacks*
4 dried orange slices (see sidebar)
5 pine cones (see sidebar)
10 sprigs of evergreen foliage such as holly, pine, cedar, or ivy
2 cinnamon sticks
Garden twine
Ribbon
Coil of pliable wire
Pliers
*If you don’t have these lying around the house from bags of rice or coffee, check with your local organic market; they may have some that you can take home and wash.
Using pliers, untwist the top of each coat hanger, leaving hooks intact. Tie hooks together using twine. Trim off the ends that you have just untwisted, as they will be too uneven to work with.
Bend hangers into circles, but do not re-secure the ends to the hooks. You will now have one circle inside the other, with the ends loose.
Cut burlap sacking into strips about 4 in (10 cm) wide. (Strips can vary in length and do not need to be straight edged.)
Thread the wires through the burlap. Twist, scrunch, and fold the burlap as you thread, gathering it together to create as much texture as possible and piercing it at intervals to create a rustic ruffled effect.
Continue until the wreath is full, or trim the wire ends to size if you run out of burlap before the wire circle is full.
Using pliers, twist the ends of the wire around the hooks to secure.
If desired, use garden twine to cover the exposed wire hook—tie the twine to the top of the hook and wrap tightly until you meet the wreath. Tie in a knot to secure.
Snip the ends of the foliage into a point and strip off any leaves on the bottom 2 in (5 cm).
Place three to four sprigs close together, in the lower right section of the wreath. Insert the stems into the burlap on an angle, toward yourself. (If they do not feel stable, or if stems do not push easily through the burlap, use wire to secure the foliage to the back of the wreath— loop an 8 in (20 cm) piece of wire around the foliage stems, pushing the wire straight through the wreath, then twist the ends together at the back to secure.)
Move about 4 in (10 cm) clockwise and insert three to four sprigs into the wreath facing the opposite direction.
Place two orange slices on the lower side of the foliage, covering the stems. Loop wire through the rinds of the orange, pushing the ends through the wreath, then twist together at the back to secure.
Place two slices over the upper stems using the same method.
Twist 12 in (30 cm) lengths of wire around the base of each of the pine cones. Arrange 3 cones in the centre of the decoration and secure to the wreath with wire.
Place two cones close to the upper stems and secure using the same method.
Attach two cinnamon sticks together with twine or ribbon. Push a wire through the ribbon at the back and secure to the wreath in the centre of the decoration.
For the finishing touch, make a bow from ribbon, push a wire through the back, and attach to the wreath directly opposite the decoration, just to the left of the hook.
Dried orange slices
So simple and so effective, these pretty accents are a joy to make. Slice oranges into 1/4 in (6 mm) discs and place in a single layer on a wire rack. Bake in the oven for about 3 hours on the lowest temperature setting, turning often to avoid sticking and to enjoy the aroma.
Bake the bugs!
Pinecones are the perfect natural festive decoration: almost everyone has easy access to them, including unwanted houseguests. After gathering, place in a single layer on a parchment paper-lined cookie sheet and bake at 250 F (120 C) for 30 to 45 minutes to get rid of mold or bugs and to stop the sap flow. Be sure to check occasionally to prevent burning.

